How to Install a Squarespace Template You've Purchased
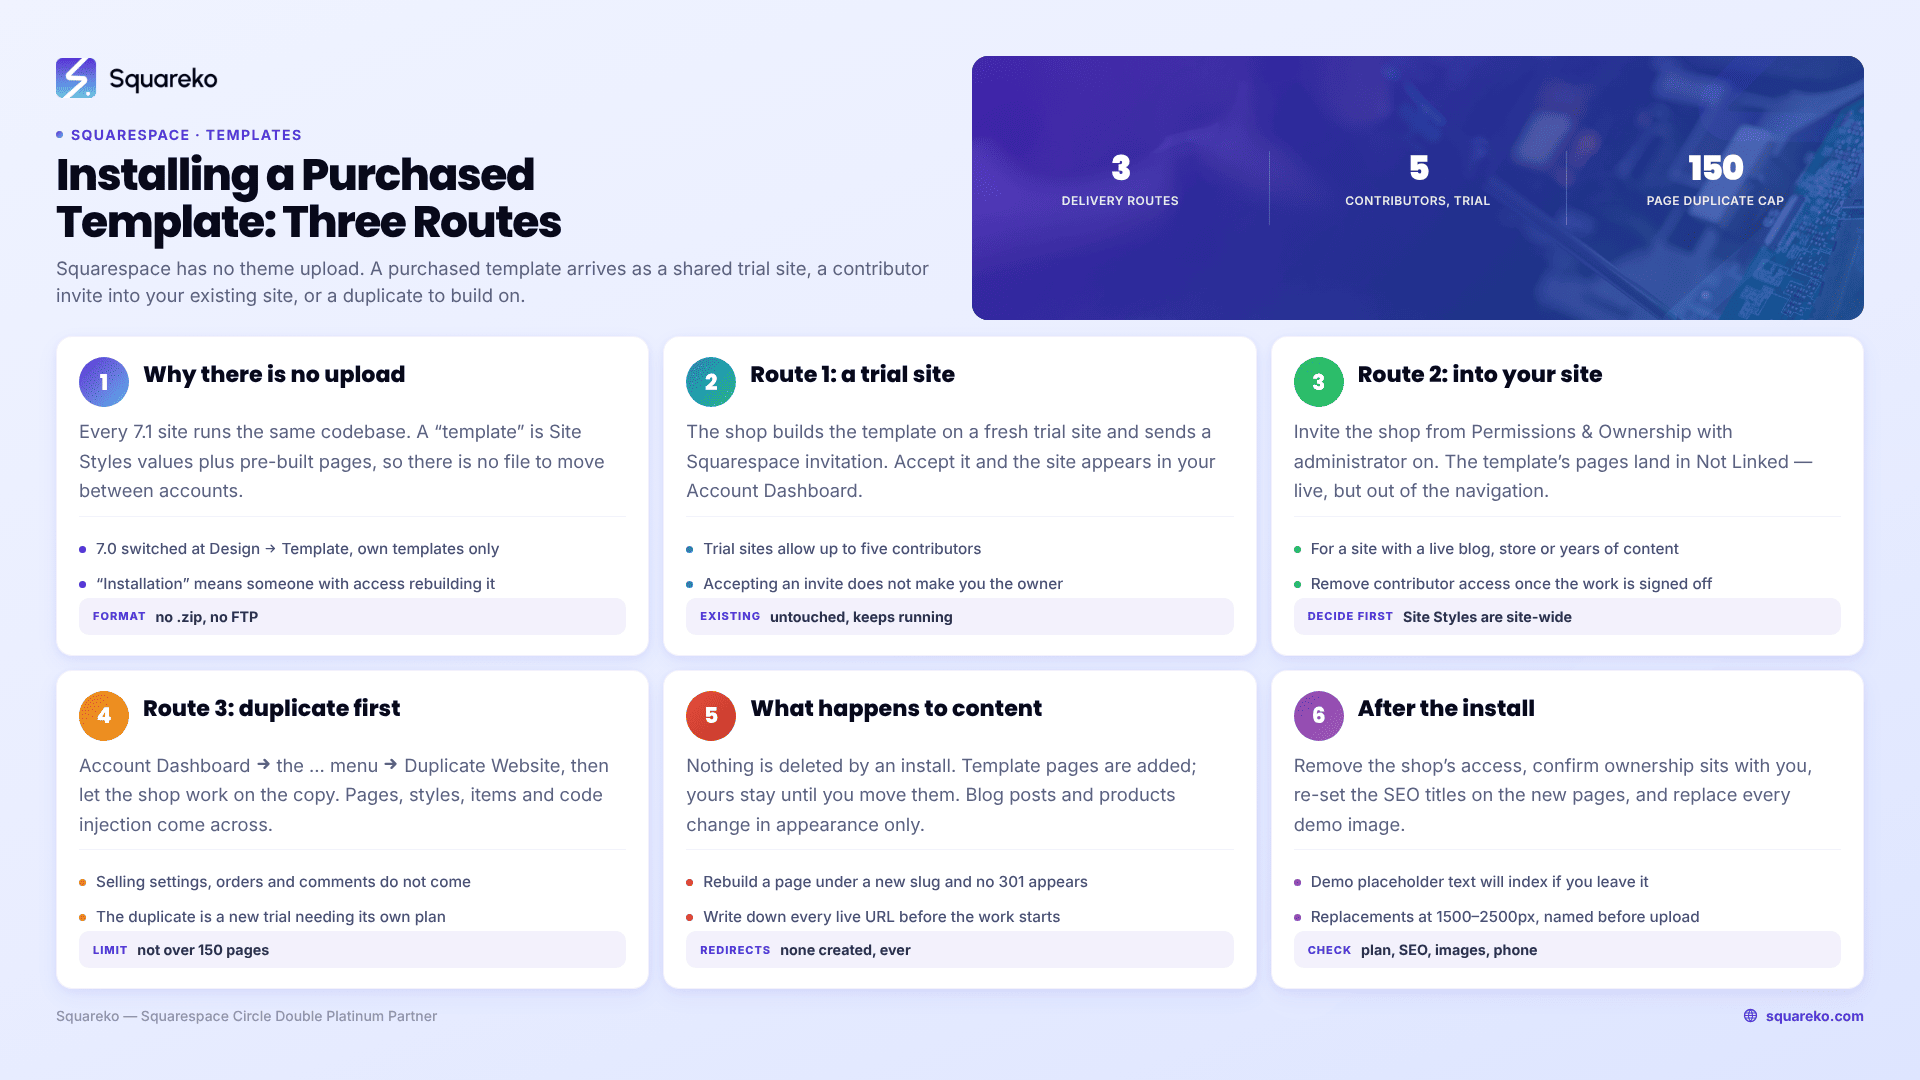
The short answer: You do not install it, because there is nothing to install. Squarespace has no theme upload — no .zip, no FTP, no "upload template" button anywhere in the platform. A purchased Squarespace template arrives one of three ways: the shop shares a ready-built trial site with you by contributor invitation, the shop is invited into your existing 7.1 site and builds the template's pages into it, or you are given a site to duplicate.
Everything else on this page follows from that. If you have bought a template and are looking for the upload screen, stop looking — check your inbox for a delivery form or a Squarespace invitation instead.
The three delivery routes compared
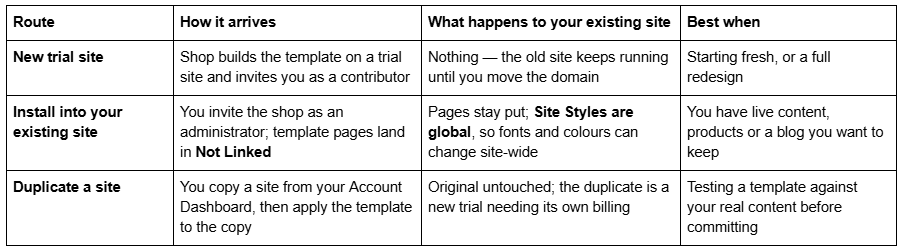
Most premium shops offer the first two and decide by asking one question on a form after purchase. Big Cat Creative sets a template up "within 48 hours" of you choosing; Applet Studio quotes 24 business hours for a new site and 48 for an existing one. Both deliver the new-site option on an extended trial — 12 months in both cases — which is a shop arrangement, not a Squarespace default.
Why there is no template upload on Squarespace
This is worth understanding, because it explains every constraint below.
Squarespace 7.1 has one template. Every 7.1 site runs the same underlying codebase. What makes two 7.1 sites look completely different is Site Styles — fonts, colour themes, button shapes, spacing — plus the arrangement of sections on each page. A "7.1 template" is therefore not code. It is a set of style settings and a set of pre-built pages, and the only way to move those between accounts is for someone with access to build them.
Squarespace 7.0 did have template switching, at Design → Template, but only between Squarespace's own templates. It never accepted third-party uploads either.
So when a shop says "installation", they mean a person with contributor access recreating the design in your account. That is why it takes hours or days rather than seconds, and why the deliverable is access rather than a download. The customisation that follows is the same job described in how to customise a Squarespace template.
It also explains what you are actually buying. A premium Squarespace template is a configured site — a set of pages, a Site Styles configuration, some Custom CSS, usually a demo content set, plus written tutorials and a support window. It is not software, it does not update itself, and nothing about it will break when Squarespace ships a platform change, because there is no plugin layer to break. The trade-off is that there is also no "reinstall" button: once the pages are in your account, they are ordinary Squarespace pages, and every subsequent change is yours to make.
Route 1 — a new trial site shared by contributor invitation
This is the most common delivery method and the least risky.
After purchase you complete the shop's delivery form with the email address on your Squarespace account.
The shop builds the template on a fresh trial site and sends an invitation from Squarespace.
You accept the invitation from the email. The site then appears in your Account Dashboard alongside your other sites.
You add your content, then upgrade the trial to a paid plan and point your domain at it.
Two practical notes. Trial sites allow up to five contributors, so if a shop, a designer and a copywriter all need access you will hit that ceiling quickly. And accepting a contributor invitation does not make you the site owner — for the site to be genuinely yours, ownership has to be transferred, which the shop should do as part of delivery. Check the Permissions & Ownership panel and confirm you are listed as owner before you upgrade and connect a domain.
Accepting the invitation itself is the step that trips people most often, and it is almost always the same cause: the invitation is tied to a specific email address. Accept it while signed into a Squarespace account on a different address and nothing appears in your dashboard. If the site is not there after accepting, sign out completely, then open the invitation link again and either sign in with the invited address or create an account on it.
Your old site keeps running untouched throughout. Nothing is at risk until you move the domain, which is the last step, not the first. Do the domain last deliberately: connect it only once the new site is populated, the redirects are mapped, and you have clicked through every page logged out.
Route 2 — installing a template into your existing Squarespace 7.1 site
This is the route for a site with a live blog, a store, or years of content you do not want to rebuild.
Open the Permissions & Ownership panel and click Invite Contributor.
Invite the shop's email address with the administrator toggle on. Administrator access is what they need to change Site Styles and add pages.
The shop builds the template's pages into the Not Linked area of your Pages panel, where they are live but not in the navigation.
You move your content into the new pages, then swap them into the navigation and delete or unlink the old ones.
Remove the shop's contributor access when the work is signed off.
The one thing to decide before they start is Site Styles. Fonts, colour themes and button styles in Squarespace 7.1 are site-wide, not per page. There is no way to apply a template's typography to its own pages only. So you have a choice, and the shop will ask you to make it: apply the template's styles — in which case your existing pages will also change, sometimes badly — or keep your current styles, in which case the new template pages will adopt your fonts and colours and will not look like the demo.
Neither is wrong. But "install the template without touching my existing pages" is not achievable, and any shop that promises it is describing the second option.
The workable middle path, when you have a lot of legacy content, is to take the template's styles and then rebuild your highest-traffic pages onto template sections one at a time, leaving the rest unlinked until you reach them. That keeps the site coherent from day one and spreads the work out. It also means the pages that matter get looked at properly rather than being carried across untouched because they happened to still render.
A hard version requirement: premium templates are built on Squarespace 7.1 and can only be installed into existing 7.1 sites. There is no route to install a 7.1 template into a 7.0 site, and no in-place upgrade from 7.0 to 7.1 — moving versions means rebuilding on a new site, which makes Route 1 the only option for 7.0 owners.
Route 3 — duplicating a site first
If you want to see the template against your real content before committing, duplicate your site and let the shop work on the copy.
Go to your Account Dashboard, click the … on the site, and click Duplicate Website.
What comes across: pages, sections, layouts and blocks; site title and logo; style settings; collection items; text content; code injection; and site language and regional settings.
What does not: selling settings including orders, discounts and subscriptions; add-on subscriptions such as domains and Email Campaigns; blog comments; any third-party integration that needs authenticated access; analytics history; billing; and contributor permissions.
Two constraints matter. Duplicating creates a new trial site that needs its own billing plan — it is not free forever. And sites over 150 pages cannot be duplicated at all, along with Developer Platform sites and parking pages.
Used deliberately, the duplicate is also your backup — and on Squarespace it is close to the only one, since there is no restore point. How to back up a Squarespace website covers the other routes. Take a duplicate before any install into a live site, whichever route you choose.
What happens to your existing content
The question underneath the keyword, in most cases.
Pages and sections. Nothing is deleted by an install. Template pages are added; yours stay where they are until you move or remove them. The fuller account of what survives a template change is in what happens to my content when I change a Squarespace template.
Blog posts and products. These are collection items and they are not affected by styling changes. They will, however, look different, because blog and product pages inherit site-wide fonts, colours and button styles. Budget time to check post layouts after a style change rather than assuming they came through unscathed.
URLs. This is where real damage happens. If you rebuild a page under a new slug, Squarespace creates no automatic 301 redirect, ever. Write down every live URL before you start, and add redirects manually in Settings → Developer Tools → URL Mappings for anything whose slug changes.
Forms and newsletter blocks. Storage connections do not travel reliably with copied or saved sections. Re-check every form's storage destination after an install and send a test submission.
Custom CSS. Existing rules written against your old sections will target elements the template's pages do not have. Expect to prune the stylesheet rather than keep it — Squarespace template CSS: 30 snippets covers the selectors that are durable in 7.1.
After the install: a short checklist
Work through this before you call the job done.
Remove contributor access for the shop in Permissions & Ownership, and confirm ownership sits with you.
Check the plan. Some templates rely on site-wide Code Injection, which is not available on every Squarespace plan — confirm what the template needs before you downgrade anything. The Custom CSS panel at Website → Website Tools → Custom CSS is available on every plan.
Re-set SEO titles and descriptions on the new pages. Template demo pages ship with the shop's placeholder text, and it will index.
Replace every demo image. They are the shop's licensed stock, not yours, and they are usually large. Upload replacements at 1500–2500px, named correctly, because filenames cannot be changed after upload.
Walk every page on a phone. A template demo is tuned to its demo content; your longer headlines and different image ratios will change the mobile layout. See how to make a Squarespace template properly mobile-friendly.
Test forms, checkout and the mobile menu logged out.
Submit the sitemap to Google Search Console and watch for 404s in the coverage report for a fortnight.
Where this stops
Installing a purchased Squarespace template is an access-and-decisions job, not a technical one. Accept the invitation, or invite the shop in, decide the Site Styles question honestly, and then work through the content.
The part that actually goes wrong is the migration around it: a site with 200 indexed URLs, a store, embedded booking and eight years of blog posts, being moved onto a new design without losing any of it. Redirect mapping alone is usually the largest single task, and it is invisible until traffic drops a month later. That is the kind of work our Squarespace website support plans exist for. For a straightforward template on a small site, though, the shop's own delivery process plus the checklist above will get you there without help.
FAQ
-
Almost entirely, yes. Site Styles controls fonts, colours, buttons, page width and site margin; section settings control height, content width, background and colour theme per section. Custom CSS is only needed for things no panel exposes, such as navigation hover states or per-page overrides.
-
No, and you do not need to. Squarespace states that all 7.1 sites share the same template and that the switching option does not exist in 7.1. Every layout difference between 7.1 sites comes from sections, styles and content, not from a template choice.
-
Click the paintbrush icon in the top-right corner while editing any page. From there you reach the Themes, Fonts, Colors, Spacing, Buttons and Animations panels. Site editing is disabled while Site Styles is open, so close the panel to move blocks again.
-
Because Site Styles is site-wide by design. To change one section only, use its section settings, which override site-wide styles. To change one page only, scope a Custom CSS rule to that page's collection ID, which appears as the id on the body element.
-
The Custom CSS panel is available on every Squarespace plan, including Basic. Code injection is different — that requires Core or above. Most template customisation is CSS, so plan level is rarely the blocker people expect it to be.
-
Fluid Engine writes layout into the page rather than the stylesheet: an inline style attribute on the section's content wrapper, plus a per-section style block. Both land after Custom CSS in the cascade, so !important is usually required to override section padding or block positioning.

Author Bio
I'm Walid Hasan, a Certified Squarespace Expert and Squarespace Circle Platinum Partner with over 12 years of hands-on experience designing and optimizing high-performing websites. Over the years, I've had the privilege of building more than 2,000 Squarespace websites for clients around the world, always focusing on clean design, strong user experience, and conversion-driven results.