How to Switch Templates on Squarespace, Step by Step
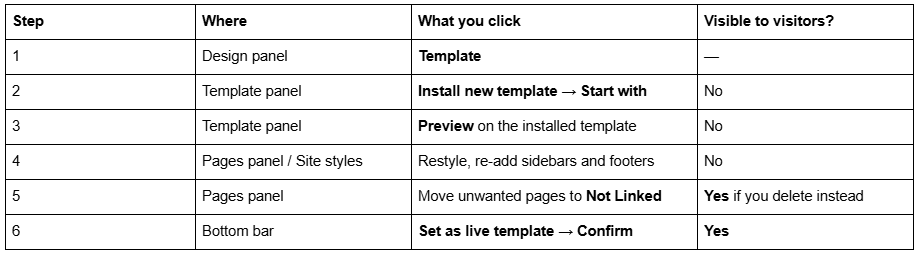
The whole switch is six clicks plus a rebuild. Install the new template from Design → Template → Install new template, hover it and click Preview, restyle and re-add template-specific content while previewing, then click Set as live template in the bottom bar and confirm. Nothing is visible to visitors until that final confirm — with one exception covered below.
This procedure applies to Squarespace 7.0 only — the version question is settled in the complete guide to changing your Squarespace template. If the Pages panel shows a version 7.1 label at the bottom, there is no Template panel and no switch to perform; see can you change templates in Squarespace 7.1? instead.
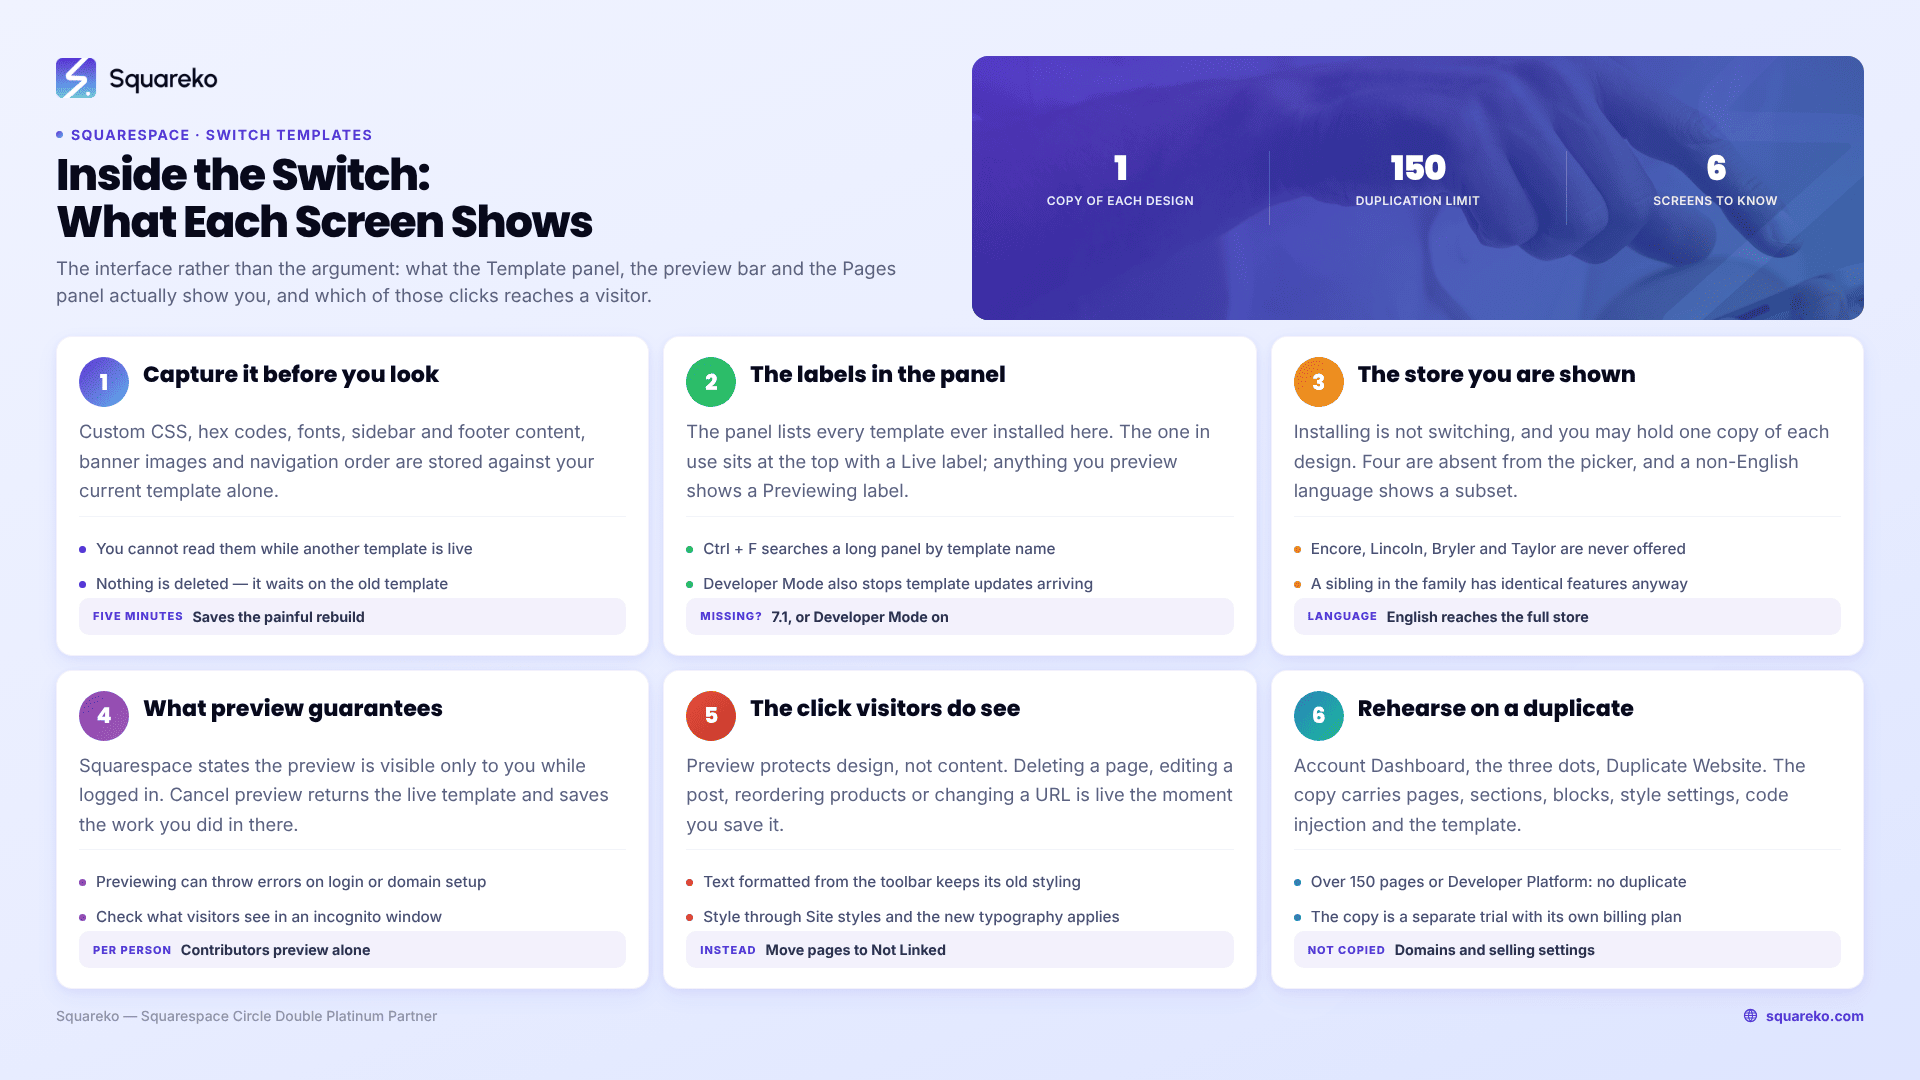
The switch at a glance
Step 0 — Capture the current template before you install anything
Five minutes, done once, and it removes the only genuinely painful part of a Squarespace template switch: rebuilding values you never wrote down.
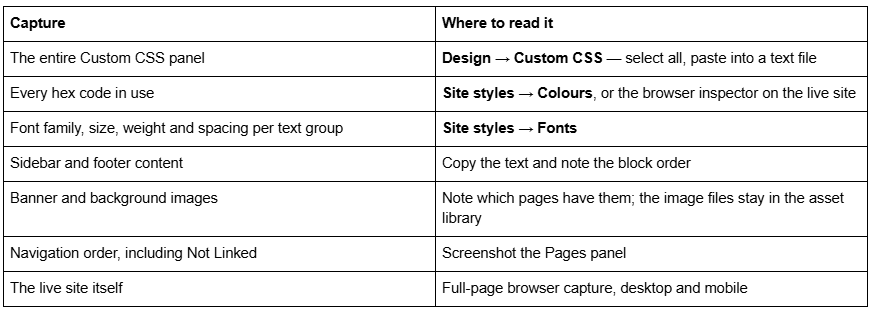
Everything in that list is template-specific on Squarespace 7.0, meaning it is stored against your current template and will not appear in the new one. It is not deleted — switch back and it returns — but you cannot see it and copy it while a different template is live, which is exactly when you need it.
Step 1 — Open the Template panel in Squarespace
From the main menu, open the Design panel and click Template.
The Template panel lists every template installed on the site. The one currently in use sits at the top with a Live label next to its name. If you are already previewing something, that template carries a Previewing label.
If Template is not in the Design panel at all, one of two things is true: you are on Squarespace 7.1, or Developer Mode is switched on. Developer Mode disables template switching outright, and it also stops your site receiving template updates. Turn it off at Settings → Developer Tools → Developer Mode — but save your Developer Platform files locally first, because disabling it discards them.
Step 2 — Install the new Squarespace template
Click Install new template. The template store opens inside the panel, organised by category, with an All templates category if you want the full list.
Browse to the design you want, hover over it, and click Start with.
The template now appears in your Template panel below the live template. Installing is not switching. Nothing has changed for visitors and nothing has changed on your live site. You can install as many templates as you like, though you can only install one copy of each.
Two things to know before you pick:
Four templates cannot be selected when switching: Encore (Aviator family), Lincoln (Brine family), Bryler (Pacific family) and Taylor (York family). If you want one of those looks, pick another template from the same family — templates in a family share identical features and style options.
Your site language filters the store. If the site language is not English, you see a curated subset. Only Julia, Kent and Om (Montauk family), Charlotte, Naomi and Pacific (Pacific family), and every Bedford, Brine and York template support non-English languages. Change the site language to English to reach the full store, accepting that built-in visitor-facing text like dates and form labels changes too.
To find a template you have already installed in a long panel, press Ctrl + F (Cmd + F on a Mac) and search the panel by name.
Step 3 — Preview the template before you switch
Hover over the newly installed template and click Preview.
Your site reloads into the new template's structure with all your existing content in place. A bottom bar appears showing the previewed template's name, with Set as live template and Cancel preview controls.
What the preview guarantees:
Only you see it. Squarespace states the preview template is visible only to you while logged in; visitors continue to see the live template.
Other contributors do not see it automatically. Installing a template makes it appear in every contributor's Template panel, but a preview is per-person. If another admin previews the same template, you will each see the template-specific changes the other has saved.
Cancelling is free. Click Cancel preview in the bottom bar and you return to the live template. Every change you made to the previewed template is saved against it for next time.
One known side effect: Squarespace notes that previewing a template may cause errors when logging in or connecting a domain. If either misbehaves during a preview, cancel the preview, complete the task, and start the preview again.
Step 4 — Restyle and rebuild in preview mode
This is the part that takes the time, and it is unavoidable. On Squarespace 7.0, presentation is stored per template, so the new template starts at its own defaults.
Expect to rebuild, in this order:
Site styles — fonts, colours, spacing, buttons. Each template exposes its own set of tweaks, so some controls you used before will not exist and some new ones will. Copy hex codes across rather than trying to match setting names.
Custom CSS — the CSS Editor is blank on a newly installed template. Your old stylesheet is intact on the old template. Paste it in and expect selectors to need rewriting, since template families use different class names.
Sidebar and footer content — these are unique to each template and start empty or with the new template's defaults.
Per-page headers and footers, banner images and background images — all template-specific, all reset.
Navigation order — the arrangement of pages, including which sit in Not Linked, is template-specific.
Everything else — pages, blocks, blog posts, products, events, gallery images, page settings, SEO titles, logo, code injection — is site-level and is already there.
While you work, use Site styles rather than local text formatting. Text carrying formatting applied through the text toolbar keeps it through the switch and will not follow the new template's typography, which is the usual cause of a switched site looking half-finished. That specific symptom is covered in why fonts and colours change after a Squarespace template switch.
Step 5 — Never delete pages while previewing
This is the single mistake that reaches visitors.
Preview mode protects design, not content. Squarespace's own guidance is explicit: do not delete pages in preview mode, because deletions affect your live site immediately. The same applies to editing a blog post, reordering products, or changing a page's URL — all of it is live the moment you save.
If the new template does not need a page, move it to the Not Linked section in the Pages panel instead. It stays out of navigation, stays available, and you can delete it properly once the new template is live and you are certain.
To check what visitors are actually seeing at any point, open your site in an incognito or private window.
Step 6 — Set the template live
When the new template is finished:
On any page of your site, click Set as live template in the bottom bar.
Click Confirm in the warning message.
The new template is now live. Every contributor sees it when they log in.
If visitors report seeing something different from what you see, the usual cause is the opposite of a problem — you are still previewing and never confirmed. Either click Set as live template to publish it or Cancel preview to keep the current one.
Switching back to your previous Squarespace template
Switching is reversible. In the Template panel, hover the old template and set it live again.
Its site styles, Custom CSS, sidebars, footers, per-page headers and navigation order all return exactly as you left them, because they were stored against that template the whole time. Content changes you made after switching stay as they are — Squarespace's wording is that most content changes persist while design and layout changes revert.
The one action that is not reversible is uninstalling. Uninstalling a template permanently deletes every template-specific change you made to it. And if the template is discontinued, you cannot reinstall it afterwards. To uninstall, set a different template live first (you cannot uninstall the live template), then hover the template and click Uninstall → Confirm.
Reinstalling your current template does not restore demo content — demo content only appears when a site is first created.
Running the switch on a duplicate site instead
If the live site cannot tolerate a half-finished week — an active shop, a page running ads — do the whole procedure on a copy and only touch production once.
From your Account Dashboard, click … on the site and choose Duplicate Website. The copy arrives as a new trial with "(Copy)" appended to its title, and it carries your pages, sections, blocks, collection items, style settings, code injection, site title and the template itself. Switch templates there, rebuild at your own pace, then repeat the finished result on the live site with your notes in hand.
Three constraints: sites over 150 pages cannot be duplicated, sites using the Developer Platform cannot be duplicated, and the duplicate is a separate trial that needs its own billing plan if you decide to keep it rather than mirror the work back. Selling settings, domains, blog comments and audio files do not copy across, so a duplicate is a design sandbox rather than a full standby site.
Four things that go wrong mid-switch
"We couldn't find the page you were looking for." The previewed template has no homepage assigned. Open the Pages panel and set one.
An index page turned into a dropdown. The new template has no index page, so Squarespace converted it. If you then switch to a third template that does support index pages, it stays a dropdown — the conversion is not re-evaluated. Only returning to the original template restores it.
A page vanished from the published site but is still in the Pages panel. It is a sub-page inside an index that the new template's index does not support. Rebuild that content on a layout page.
Your info page or project page is gone. The info page belongs to the Aviator family and will not display anywhere else; the project page belongs to the York family and converts to a gallery page on switching. Both come back on returning to the original family — the project page needs rebuilding by hand.
Before you set it live
Run these four checks while still in preview: every navigation link resolves, the homepage is set, banner and background images are back, and Custom CSS is pasted in and rendering. Then check the site in an incognito window immediately after confirming.
If a page URL changed at any point during the rebuild, add the redirect yourself — Squarespace never creates one automatically. Developer tools → URL mappings, format /old-url -> /new-url 301, and the old page must be deleted or disabled for the redirect to fire.
Most 7.0 switches are a focused afternoon. Where it stops being that is a Brine-family site with several hundred lines of undocumented CSS, or a site whose search traffic cannot absorb a week of half-finished pages. If that is the situation, our premium Squarespace templates and build service take the rebuild off you — though if your site is a dozen pages and a blog, the six steps above are genuinely all there is to it.
FAQ
-
Design panel → Template, on version 7.0 only. The live template sits at the top of the panel with a Live label. If the option is missing, either you are on version 7.1, which has no Template panel, or Developer Mode is switched on and blocking template changes.
-
No. Squarespace states the preview template is visible only to you while logged in, and visitors keep seeing the live template. Other contributors do not see your preview automatically either. Content changes are the exception — those go live immediately, preview or not.
-
Click Cancel preview in the bottom bar. Your site returns to the live template and every change you made to the previewed template is saved against it, so you can pick the preview up again later without redoing the work.
-
Open Design → Template, hover the old template and set it live. Its site styles, Custom CSS, sidebars, footers and navigation order return exactly as you left them. This only works if you never uninstalled it — uninstalling deletes those settings permanently.
-
Set a different template live first, since the live template cannot be uninstalled. Then hover the template in Design → Template and click Uninstall, then Confirm. Check whether the template is discontinued first — discontinued templates cannot be reinstalled once removed.
-
The previewed template has no homepage assigned. Open the Pages panel and set a homepage. This happens most often when the old homepage was an info page, which only exists in the Aviator family and will not display in any other template.

Author Bio
I'm Walid Hasan, a Certified Squarespace Expert and Squarespace Circle Platinum Partner with over 12 years of hands-on experience designing and optimizing high-performing websites. Over the years, I've had the privilege of building more than 2,000 Squarespace websites for clients around the world, always focusing on clean design, strong user experience, and conversion-driven results.