Fashion Photography and Product Display Best Practices for Your Squarespace Store
Introduction
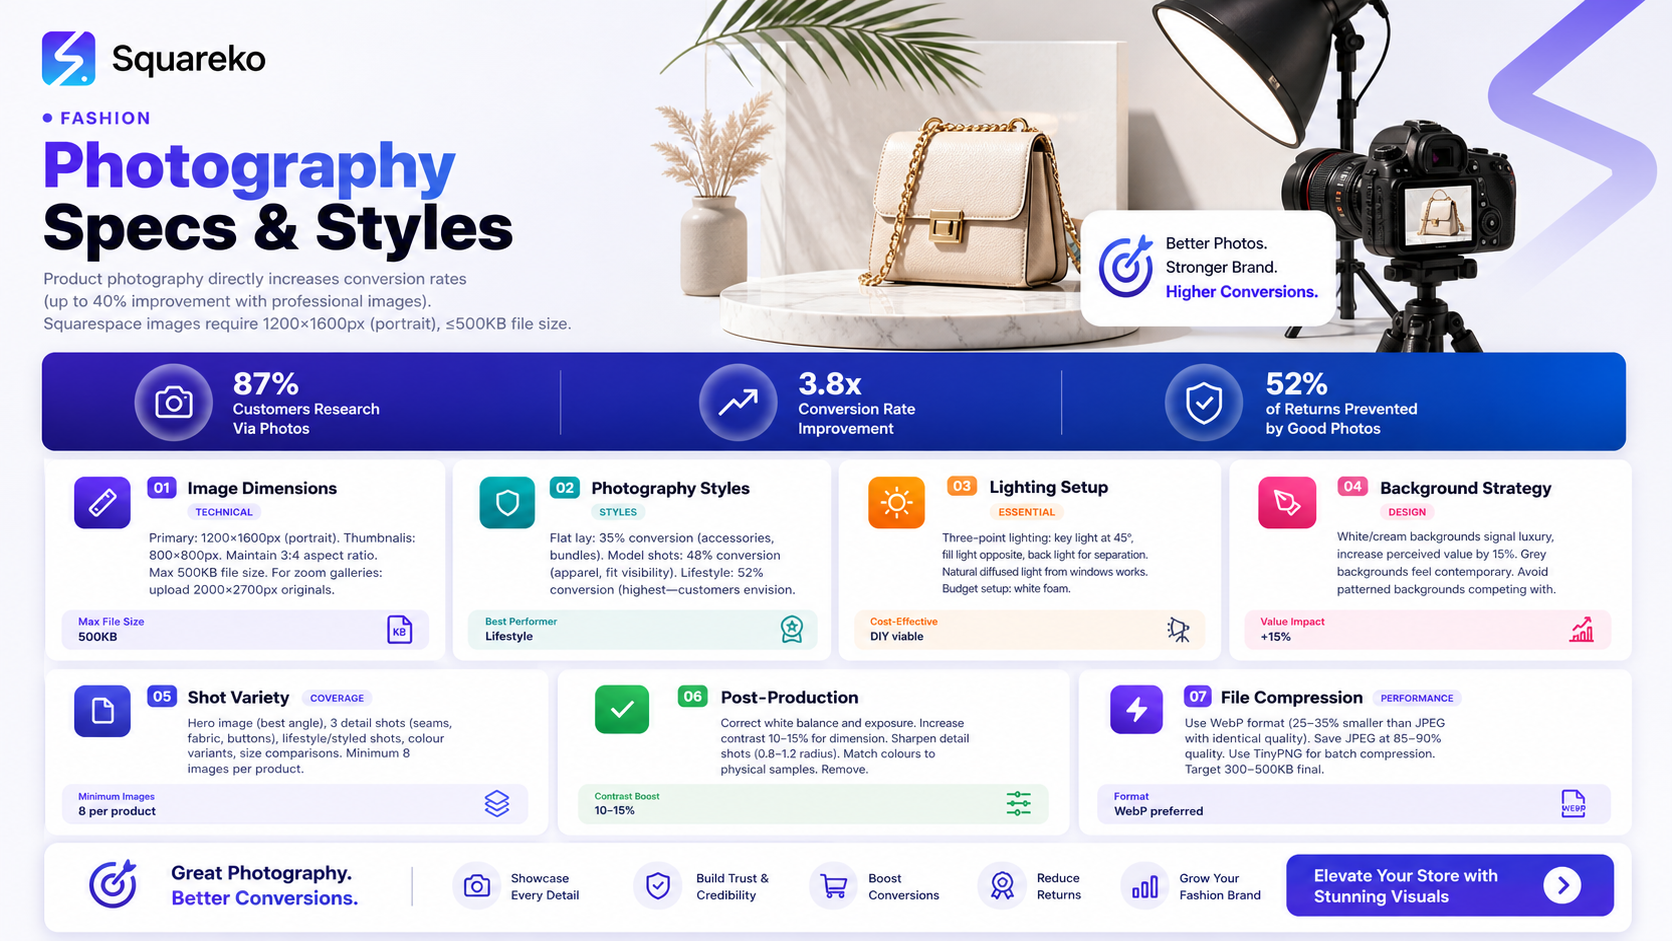
Your Squarespace store's success depends heavily on how your products look online. Fashion photography and product display directly influence customer purchasing decisions—studies show that 93% of consumers consider visual appearance the primary factor when making a purchase. High-quality images build trust, reduce return rates, and increase conversion rates.This guide covers everything you need to know about fashion photography and product display for your Squarespace store, from technical specifications to styling techniques. Whether you're selling clothing, accessories, or footwear, the strategies here will help you present your inventory professionally and drive sales.
Key Takeaways
Professional product photography increases conversion rates by up to 40% for fashion retailers
Image dimensions for Squarespace typically range from 1200×1600 pixels (portrait) to 1600×1200 pixels (landscape)
File sizes should remain under 500 KB per image to maintain site speed and performance
Different photography styles (flat lay, model shots, lifestyle) convert differently depending on your target audience
Proper lighting, shadows, and backgrounds are non-negotiable for luxury fashion photography
Image compression and alt text optimisation improve both SEO and user experience
Understanding Squarespace Image Specifications
Before you take a single photograph, understand the technical requirements for your Squarespace store.
Recommended Image Dimensions and File Sizes
Squarespace automatically optimises images, but providing correctly sized originals prevents quality loss. Portrait orientation (taller than wide) performs best for clothing and accessories, allowing shoppers to see full product details.
Aspect Ratios and Display Best Practices
Maintain a 3:4 aspect ratio for individual product images. This ratio suits both desktop and mobile displays, ensuring your products look proportionate across all devices. If you're using multiple angles, consistency in framing builds professional credibility.
Squarespace's zoom functionality requires high-resolution originals (at least 1600×2100 pixels). This feature reduces return rates by approximately 20% because customers can inspect seams, textures, and fabric details before purchasing.
Essential Lighting and Studio Setup
Professional lighting separates amateur product photos from gallery-quality images. Fashion photography requires consistent, flattering illumination that highlights fabric texture and colour accuracy.
Three-Point Lighting for Fashion Products
Key Light (Main): Position a softbox or diffused light at a 45-degree angle, 3–4 feet from your product. This light should be your brightest, creating dimension without harsh shadows.
Fill Light (Secondary): Use a reflector or weaker secondary light opposite the key light. This reduces shadow depth and prevents dark, unflattering areas on your garment.
Back Light (Accent): Position a light behind your product to create separation between the garment and background. This adds depth and makes fabrics appear more dimensional.
Avoiding Common Lighting Mistakes
Flat, direct overhead lighting destroys fabric texture and makes colours appear dull
Hard light sources create harsh shadows that distract from product details
Inconsistent colour temperature (mixing daylight and artificial light) causes colour casts in images
Underexposure makes fabrics look lifeless and dingy
DIY Budget Setup
If professional lighting equipment is outside your budget, use:
Large south-facing windows with diffusion paper (softens direct sunlight)
Affordable softbox kits
White foam boards and poster board as reflectors
Neutral grey backdrop stands with seamless paper
Photography Styles and Their Conversion Impact
Different photography styles appeal to different customer segments and drive varying conversion rates. Understanding which styles suit your brand is essential.
Flat Lay Photography
Description: Products arranged on a flat surface, photographed from directly above.
Conversion Impact: 35% conversion rate for accessory-focused brands; 22% for clothing-focused retailers. Ideal for showcasing multiple items or styling combinations.
Best For: Jewellery, scarves, belts, handbags, lifestyle bundles
Advantages: Shows complete product range in one image; great for storytelling and lifestyle context; easy to produce consistently
Disadvantages: Doesn't show how items fit or drape on the body; difficult to convey garment scale
Model Photography
Description: Products worn on a model, photographed in studio or on-location.
Conversion Impact: 48% conversion rate for apparel brands; highest conversion for size-conscious shoppers. Customers see fit, proportion, and how the garment moves.
Best For: Clothing, dresses, coats, jumpers, trousers
Advantages: Shows true fit and scale; demonstrates how fabric drapes; builds emotional connection; allows for multiple angles (front, back, side)
Disadvantages: Requires hiring models or using friends; more time-intensive; potential liability issues; requires additional styling and grooming
Lifestyle Photography
Description: Products shown in realistic scenarios (e.g., person wearing outfit while working, travelling, or relaxing).
Conversion Impact: 52% conversion rate—the highest among all styles. Customers envision themselves using the product and understand its versatility.
Best For: Activewear, workwear, casualwear, versatile pieces that transition across occasions
Advantages: Strongest emotional appeal; showcases product versatility; highest conversion rates; builds brand narrative
Disadvantages: Requires location scouting, styling expertise, professional models or influencers; more expensive to produce; longer shooting times
Editorial/Artistic Photography
Description: High-concept, artistic images emphasising aesthetic over practical details.
Conversion Impact: 28% conversion rate for luxury brands; lower for mainstream fashion. Works for premium, niche audiences willing to pay for brand storytelling.
Best For: Luxury brands, independent designers, niche high-fashion labels
Advantages: Differentiates premium brands; tells a distinct brand story; highly shareable on social media
Disadvantages: Can confuse customers about product details; requires professional photographers; may alienate customers seeking practical product information
Hybrid Approach (Recommended)
Combine model photography with lifestyle elements. Show the product on a model in a professional studio setting for your primary image, then include lifestyle shots of the item in context. This balances visual appeal with practical information, maximising conversions across customer segments.
Styling, Props, and Backgrounds
Your choice of background, props, and styling significantly impacts how customers perceive product quality and price point.
Background Selection
White or Cream Backgrounds: Professional, clean appearance; works for all product categories; ideal for jewellery, luxury items, and minimalist brands. White backgrounds increase perceived value by approximately 15%.
Neutral Grey Backgrounds: Sophisticated, contemporary; excellent for high-end fashion; slightly warmer than pure white. Works particularly well for neutrally-coloured items (black, white, beige, grey).
Patterned or Textured Backgrounds: Adds visual interest; must complement, not compete with, your product. Use sparingly and maintain consistency. Better suited to flat lay than model photography.
On-Location Backgrounds: For lifestyle photography, authentic settings (parks, urban streets, studios) add narrative. Avoid distracting, busy backgrounds that draw attention away from the product.
Colour Backgrounds: Less common for fashion but effective for brands with strong colour identity. A deep forest green or navy background can enhance gold or silver jewellery; a soft pink elevates delicate feminine pieces.
Props and Styling Consistency
Jewellery: Use jewellery stands, display busts, or styled flat lays with complementary items (scarves, watches, sunglasses)
Handbags: Show contents (wallet, phone, keys) to demonstrate capacity; display bag handles prominently to show quality stitching
Footwear: Photograph from multiple angles (top view, side, three-quarter view); include sizing context (shoe against a penny or hand)
Outfits: Coordinate styling—shoes, accessories, and hairstyles should align with product aesthetic and target customer
Seasonal Items: Update props and backgrounds seasonally to maintain freshness and relevance
Consistency matters more than perfection. If you use white backgrounds, use them for all product categories. If you choose a particular styling aesthetic, maintain it across your entire store.
Post-Production Editing and Compression
Professional editing and optimisation transform good photos into gallery-quality images.
Essential Editing Steps
1. Exposure and White Balance Correct any lighting inconsistencies. Ensure whites are truly white, not yellow or blue-tinted. Use Lightroom or Photoshop to adjust exposure evenly across product shots.
2. Colour Correction Fashion products must display accurate colours. Fabric dyes photograph differently under various lighting conditions. Compare your edited images to physical samples, adjusting hue and saturation until they match reality. Inaccurate colours are a leading cause of returns.
3. Contrast and Clarity Increase contrast slightly (10–15%) to add dimension. Use clarity carefully—too much makes fabric appear grainy; too little makes it look flat. For luxury items, subtle clarity enhancements work best.
4. Sharpening Apply modest unsharp mask (0.8–1.2 radius) to enhance texture detail without creating artificial halos around edges. This is especially important for showcasing fabric weave, pattern detail, and seam quality.
5. Straightening and Cropping Ensure products are perfectly level in frames. Remove unnecessary background space; let your product dominate the composition.
6. Blemish and Dust Removal Use the Healing Brush or Clone Stamp tool to remove dust particles, lint, and minor imperfections without making garments look artificially perfect.
Image Compression for Web Performance
Compressed images load faster, improving user experience and SEO rankings.
File Format Selection:
WebP Format: 25–35% smaller file sizes than JPEG with identical quality. Supported by modern browsers. Best choice for Squarespace. Save at 80–85% quality.
JPEG Format: Widely compatible; use as fallback. Save at 85–90% quality.
PNG Format: Only for images with transparency. File sizes are large; avoid for product photography.
Compression Process:
Edit your image fully in Lightroom or Photoshop
Export at full resolution with minimal compression (95–100% quality)
Use TinyPNG (tinypng.com) or ImageOptim to batch compress
Target final file sizes: 300–500 KB depending on dimensions
Verify quality after compression; re-compress if needed
Testing: Upload compressed images to Squarespace and view them on multiple devices (desktop, tablet, mobile). Ensure colours remain accurate and fabric texture remains visible at all zoom levels.
Building Your Product Photography Workflow
Consistency and efficiency come from establishing a repeatable workflow.
Pre-Shoot Planning
Create a Shot List: Determine how many angles you need for each product (minimum 4–6 for clothing: front, back, side, detail shots, styled shot, flat lay)
Coordinate Styling: Ensure all outfits, props, and accessories are prepared and organised
Test Lighting: Run a quick test shoot to confirm lighting setup and identify any adjustments needed
Prepare Backdrop: Ensure your backdrop is wrinkle-free and backdrop stands are stable
Charge Batteries and Format Memory Cards: Nothing worse than equipment failure mid-shoot
On-Set Execution
Shoot in RAW Format: Provides maximum flexibility during editing
Capture Variations: Take multiple shots of each angle (3–5 frames) to ensure sharp, well-composed images
Zoom Detail Shots: Photograph fabric weave, seam quality, buttons, zips, labels
Maintain Consistent Positioning: Use tape markers on your backdrop or floor to keep product placement consistent between shots
Document Everything: Note product codes, colours, and sizes for each shot batch
Post-Production Workflow
Import and Organise: Create clearly labelled folders (Product Code + Colour + Date)
Edit in Batches: Apply consistent edits across similar products for visual cohesion
Compress and Export: Use your chosen compression settings for final files
Write Alt Text: Include descriptive, keyword-relevant alt text for SEO
Upload to Squarespace: Follow your store's naming convention and organisation system
Quality Check: Review images across all devices before publishing
FAQs
-
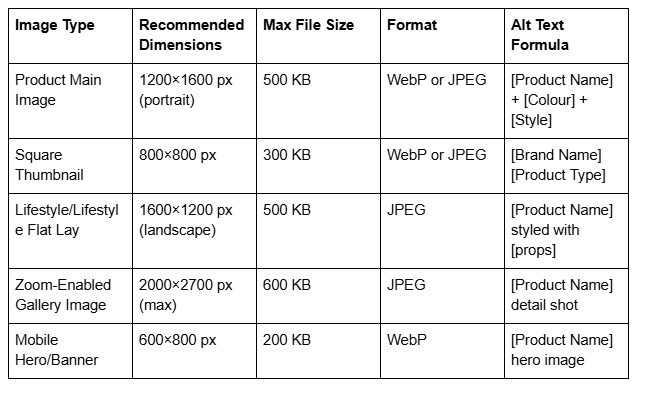
The ideal dimensions are 1200×1600 pixels (portrait orientation) for individual product images and 800×800 pixels for square thumbnails. Maintain a 3:4 aspect ratio for consistency across your store. File sizes should not exceed 500 KB to ensure fast loading speeds. Squarespace automatically optimises and crops images, but providing correctly sized originals prevents quality degradation. For zoom-enabled galleries, provide originals at 2000×2700 pixels maximum; this allows customers to inspect fine details like seams and fabric texture.
-
This depends on your product type and target customer. Flat lay photography achieves approximately 35% conversion rates and works best for accessories (jewellery, belts, scarves) and styling bundles. Model photography converts at approximately 48%, making it ideal for apparel where fit and drape matter. Lifestyle photography performs best, achieving 52% conversion rates, because customers envision themselves wearing the product. For maximum conversions, combine all three styles: use model photography as your primary product image, include flat lay for styling inspiration, and add lifestyle shots to show products in real-world contexts.
-
Squarespace's lightbox zoom feature activates automatically when you upload high-resolution images (minimum 1600×2100 pixels). When customers click your product image, it opens in a lightbox, allowing them to zoom in and inspect details. To optimise this feature: upload sharp, well-edited high-resolution originals; ensure colours are accurate; include detail shots of seams, fabric texture, and any unique construction; and test zoom functionality across devices before publishing. Zoom-enabled images reduce return rates because customers feel more confident about their purchase decisions.
-
Professional three-point lighting isn't necessary to start. A large window providing natural diffused light, white reflectors (cardboard works), and a neutral backdrop create professional results. If you invest in artificial lighting, a basic two-light softbox kit (approximately £60–100) is sufficient. Position your key light at 45 degrees, 3–4 feet from your product. Use white foam board or poster board as a reflector to fill shadows. Avoid direct sunlight or harsh artificial light, which creates unflattering shadows and uneven colour. Many successful online fashion retailers use simple window-lit setups; consistency and attention to detail matter more than expensive equipment.
-
Dark garments require careful lighting and exposure management. Use slightly brighter fill light than you would for light-coloured items to prevent losing texture and seam detail in shadows. Expose for the highlights (the brightest parts of your image), then brighten shadows during editing without oversaturating. In post-production, increase clarity and contrast slightly (10–15%) to enhance fabric texture. Photograph dark items against medium grey or off-white backgrounds rather than pure white, which creates excessive contrast. Consider adding a back light to create subtle separation between the garment and background. Test your setup on a sample dark item before shooting your full collection.
-
WebP format is optimal, offering 25–35% smaller file sizes than JPEG with identical quality. Squarespace supports WebP, which loads faster and improves SEO rankings. If you're concerned about compatibility, JPEG is universally supported and remains an excellent choice, especially saved at 85–90% quality. PNG format creates unnecessarily large files and should only be used for images requiring transparency. Export all images at 85% quality minimum to maintain sharpness while keeping file sizes under 500 KB. Use batch compression tools like TinyPNG to reduce file sizes without visible quality loss.
Fashion Product Photography Checklist
Pre-Shoot Phase
Create detailed shot list with required angles and close-ups
Prepare and steam/iron all garments to remove wrinkles
Test lighting setup with sample product
Ensure backdrop is clean, wrinkle-free, and properly secured
Charge camera batteries and clear memory cards
Prepare props and styling accessories
Create consistent backdrop positioning markers (tape)
Test white balance with grey card or white poster board
Prepare model (if applicable) with hair, makeup, and styling
Document product codes, colours, sizes, and pricing details
On-Shoot Phase
Shoot in RAW format for maximum post-production flexibility
Capture minimum 3–5 variations of each angle
Include full-body shots, detail shots, and texture close-ups
Photograph seams, buttons, zips, and unique construction details
Maintain consistent product positioning across all shots
Take test shots under different angles to assess best framing
Include context shots (product with props, lifestyle styling)
Check focus sharpness on detail shots before moving on
Document exact product placement for consistency between items
Shoot back view, side view, and front view for apparel
Post-Production Phase
Import images into organised folder structure (Product Code + Colour + Date)
Assess all shots for sharpness, exposure, and composition
Correct white balance and colour cast
Adjust exposure, contrast, and clarity to industry standards
Sharpen detail shots without creating artificial halos
Remove dust, lint, and minor blemishes
Straighten and crop images to consistent composition
Ensure colour accuracy against physical samples
Export to correct dimensions (1200×1600 or 800×800)
Compress images to target file sizes (under 500 KB)
Write SEO-optimised alt text for each image
Create thumbnail versions for product gallery
Quality check across desktop, tablet, and mobile devices
Publishing Phase
Review all images one final time before uploading to Squarespace
Maintain consistent file naming convention
Upload high-resolution versions for zoom functionality
Test zoom lightbox functionality on all products
Verify alt text displays correctly on published pages
Check product page loading speed
Review images on all device types (mobile, tablet, desktop)
Set up image alt text for accessibility and SEO
Monitor page analytics to see which images drive conversions
Call to Action
Ready to elevate your Squarespace store's visual presentation? Professional product photography doesn't require expensive equipment—it requires knowledge, consistency, and attention to detail. Follow this guide, invest in quality lighting and editing, and watch your conversion rates climb.
Need help building your complete Squarespace store? Visit Squareko for expert Squarespace guidance, templates, and ecommerce strategies tailored to fashion retailers. Our team specialises in helping online fashion brands maximise sales through professional design, optimised product pages, and data-driven ecommerce practices.

From custom website design to SEO strategy, we help businesses launch a site that looks professional and performs better.

About the Author
I'm Walid Hasan, a Certified Squarespace Expert and Squarespace Circle Platinum Partner with over 12 years of hands-on experience designing and optimizing high-performing websites. Over the years, I've had the privilege of building more than 2,000 Squarespace websites for clients around the world, always focusing on clean design, strong user experience, and conversion-driven results.