Client Gallery & Booking System Setup for Squarespace Photographers
Introduction
Running a successful photography business requires more than just talent behind the lens. Your clients need a seamless way to browse your work, select services, and book you for their event. If you're building your photography website on Squarespace, you're in luck—the platform offers powerful built-in tools to create a Squarespace client gallery booking photographer setup that rivals expensive third-party solutions.
The challenge many photographers face is knowing where to start. Should you use Squarespace's native gallery features? Do you need additional plugins or integrations? How do you set up a booking system that actually converts browsers into paying clients? These questions stop many talented photographers from taking full advantage of their website's potential.
In this guide, we'll walk you through everything you need to know about creating professional client galleries and connecting a booking system to your Squarespace site. Whether you're just starting out or looking to upgrade an existing portfolio, you'll learn the exact steps to showcase your photography and accept bookings without the complicated setup or expensive software licenses that come with specialized photography platforms.
Key Takeaways
Squarespace has a built-in gallery feature that works well for portfolio display, though it lacks some specialized proofing features of dedicated platforms
A complete photography business website requires both a portfolio gallery and a separate client delivery gallery
Acuity Scheduling integrates directly with Squarespace and is one of the best ways to add a professional booking system
Combining Squarespace's gallery tools with Acuity gives you a powerful, cost-effective solution for photographers
Third-party platforms like Pic-Time and Pixieset offer specialized features, but Squarespace can handle 90% of photographer needs at a fraction of the cost
Does Squarespace Have a Built-In Gallery for Photographers?
Yes, Squarespace absolutely has a built-in gallery feature that photographers can use. In fact, it's one of the platform's strongest selling points for creative professionals.
Squarespace galleries include lightbox functionality, which means when a client clicks on an image, it expands into a full-screen view without taking them away from your site. You can organize images into albums, set captions and credits, and customize the layout to match your brand. The galleries are mobile-responsive by default, which is crucial since over 60% of portfolio browsing happens on phones.
The big question photographers ask is: Is Squarespace's gallery enough, or do I need a specialized platform? The answer depends on your specific needs. For showcasing your portfolio and attracting clients, Squarespace's gallery is absolutely sufficient. For delivering final photos to clients with password protection, download management, and proofing features, you'll likely want additional tools.
We'll cover this distinction in detail throughout this post, but the short answer is: use Squarespace's gallery to showcase your work, and consider adding a separate solution (like a private gallery via Acuity Scheduling or a specialized platform) for client delivery.
Understanding the Two Types of Galleries You Need
Before you start building, it's essential to understand that professional photographers typically need two distinct galleries:
Portfolio Gallery (Public-Facing) This is what potential clients see on your website. It showcases your best work organized by category—weddings, portraits, events, etc. The goal of this gallery is to demonstrate your style and convince visitors to book you. This is your sales gallery, and Squarespace's built-in tools handle this perfectly.
Client Delivery Gallery (Password-Protected) This is separate from your portfolio. After a shoot, you deliver the final, edited images to your client in a private, password-protected space. Clients download their images, provide feedback, and approve the final selects. This gallery has different requirements than a portfolio gallery—it needs robust download management, password protection, and sometimes watermarking.
Many photographers try to use the same gallery for both purposes and end up with either a cluttered portfolio or a client delivery system that doesn't showcase their work effectively. We'll show you how to build both.
Step-by-Step: Setting Up Your Portfolio Gallery on Squarespace
Step 1: Create a New Page for Your Gallery
Log into your Squarespace account and navigate to your site editor. Create a new page dedicated to your portfolio gallery. You might call it Portfolio, My Work, or organize it by service categories like Weddings or Portraits.
In the page settings, choose the page type that gives you the most flexibility. Squarespace's Fluid Engine (available on newer templates) gives you the most control over layout.
Step 2: Add a Gallery Block
Click the Add Block button and search for Gallery. Squarespace offers several gallery types:
Grid Gallery: A traditional grid layout that works well for most photographers
Stack Gallery: Images display in a full-width stack, good for storytelling
Carousel: Images scroll horizontally, useful for limited space
Slideshow: Full-screen image viewer with navigation
For a portfolio gallery, a Grid Gallery is usually your best bet because it showcases multiple images and draws visitors deeper into your work.
Step 3: Upload and Organize Your Images
Click on the gallery block and upload your best images. Here's where quality matters—use only your strongest work. A portfolio with 12 exceptional images beats 50 mediocre ones.
Organize your images into albums within the gallery. Each album can represent a different service or style. For example:
Wedding Photography
Engagement Shoots
Portrait Sessions
Event Coverage
Step 4: Customize Gallery Settings
In the gallery settings panel, you'll find several customization options:
Image Captions: Add details about each shoot (location, services, etc.)
Credits: If you collaborated with other vendors, give them credit
Lightbox Effect: Enable this so images expand when clicked
Aspect Ratio: Choose uniform dimensions for a professional appearance
Spacing: Adjust the gap between images
Step 5: Optimize for Mobile and Desktop
Preview your gallery on both mobile and desktop. Squarespace galleries are responsive, but sometimes you'll want to adjust spacing or the number of columns. Use the device preview tool to see how your portfolio looks on different screen sizes.
Step 6: Add a Call-to-Action Below the Gallery
After showcasing your work, visitors should know what to do next. Add a button or text below your gallery that directs them to your booking page or contact form. Something like Love my style? Let's work together—book a consultation today.
Step 7: Configure SEO Settings
In the page settings, add an SEO title and meta description. Include your focus keyword: squarespace photographer portfolio or similar. Example meta description: "Browse Sarah's wedding and portrait photography portfolio. Serving [your city] since 2018. Book your session today."
Step-by-Step: Setting Up Client Galleries for Photo Delivery
Your client delivery gallery is separate from your portfolio. There are several approaches:
Option A: Using Acuity Scheduling's Client Gallery Feature
Acuity Scheduling includes a basic gallery feature that allows clients to view and download photos. Here's how to set it up:
Step 1: Set Up an Acuity Products/Services In your Acuity account, go to Settings > Products/Services. Create a "Photo Gallery" product that serves as a placeholder for your delivery gallery.
Step 2: Create a Folder for Each Client Session Use Acuity's file storage to create a folder for each client or session. For example, Smith Wedding - June 2026 or Johnson Family Portraits.
Step 3: Upload Photos to the Client's Folder Upload your edited, final photos to the client's folder. You can organize them into subfolders by location or event segment.
Step 4: Share the Access Link with Your Client Acuity generates a unique link for each folder that you can email to your client. The link includes a password that only they know. Clients can view, download, and share feedback through the interface.
Step 5: Set Download Limits and Expiration In Acuity settings, you can configure:
How many downloads each client gets
How long the gallery remains accessible (30 days, 60 days, etc.)
Whether clients can share the link with others
Option B: Using Squarespace Folders with Password Protection
If you don't want to use a third-party service for delivery, you can create a password-protected page on your Squarespace site:
Step 1: Create a Password-Protected Page Create a new page and go to Settings > Visibility. Change the visibility to "Password Protected" and set a strong password.
Step 2: Add a Gallery Block Add your gallery block and upload the client's photos. Unlike your portfolio gallery, this gallery doesn't need to be beautiful or branded—it's functional.
Step 3: Organize by Client Create separate pages for each client or session. Title them clearly: Smith Wedding Gallery or Johnson Portraits.
Step 4: Share the Password with Your Client Email your client with the link and password. They can now view and download their photos.
Limitation: Squarespace doesn't natively limit downloads, track who's accessed the gallery, or set expiration dates. For these features, you'll need the Acuity approach or a third-party solution.
Setting Up Acuity Scheduling for Photography Bookings
Acuity Scheduling is a purpose-built scheduling and booking system that integrates beautifully with Squarespace. Here's how to set it up specifically for photography bookings.
Step 1: Create Your Acuity Account
Go to acuityschedule.com and sign up. Choose the plan that fits your needs. For photographers starting out, the basic plan is usually sufficient.
Step 2: Define Your Service Types
In Acuity, go to Services and create entries for each service you offer:
Engagement Photo Session (1 hour, $300)
Wedding Photography (12 hours, $3000)
Family Portrait Session (30 minutes, $150)
Event Photography (4 hours, $400)
For each service, include:
Duration: How long the session lasts
Price: What you charge
Capacity: How many of this service you can offer per day (usually 1 for photographers)
Description: What the client gets (number of edited photos, turnaround time, etc.)
Step 3: Set Your Availability
Go to Availability and set your working hours. Specify:
Which days you typically work
What times you're available for consultations or sessions
Any blackout dates (vacations, holidays, busy seasons)
How much advance notice you need for bookings
Step 4: Customize Intake Forms
When a client books, Acuity can collect information through an intake form. Customize this to gather photography-specific details:
Event date and location
What they're looking for (style, mood, must-have shots)
Any special requests or considerations
Payment method preference
Step 5: Set Up Automated Confirmations
Configure Acuity to send automated emails:
Booking confirmation with details
Reminder email 1 week before
Reminder email 24 hours before
Post-session thank you and next steps
Step 6: Connect Your Payment Method
Link Acuity to Stripe or another payment processor so clients can pay at booking. This ensures commitment and reduces no-shows.
Step 7: Enable Calendar View
In Acuity settings, generate a public booking calendar that you can embed on your website. Clients will see your available time slots and book directly.
Connecting Your Booking System to Your Website
Now that you have both a portfolio gallery and a booking system set up, you need to connect them to your Squarespace site so clients can easily book you.
Step 1: Get Your Acuity Booking Code
Log into Acuity Scheduling. Go to Integrations and find the Squarespace integration. Acuity will provide you with an embed code.
Step 2: Create a "Book Now" Page on Squarespace
Create a new Squarespace page titled Book a Session or Schedule Your Session. This is where you'll embed your Acuity calendar.
Step 3: Add a Code Block
Click Add Block and choose Code. Paste the Acuity embed code into the code block.
Step 4: Customize the Surrounding Content
Add text above and below the booking calendar that explains your process:
Example: "Ready to book? Choose your service and select your preferred date and time below. You'll receive a confirmation email with all the details. If you have questions before booking, feel free to contact me at [email]."
Add text below with pricing and what to expect: A 30-minute consultation is complimentary and helps me understand your vision. Sessions are booked pending a 50% deposit, with the remainder due 7 days before your appointment.
Step 5: Link Your Portfolio Gallery to the Booking Page
On your portfolio gallery page, add a button that links to your Book Now page. This creates a natural flow: client sees your work → wants to book → clicks button → lands on booking page → schedules appointment.
Step 6: Test the Full Experience
Book a dummy appointment through your own website to make sure everything works:
Does the calendar load correctly?
Does the confirmation email arrive?
Can you see the booking in Acuity?
Does the payment integration work (if you're using it)?
Squarespace Gallery vs. Pic-Time vs. Pixieset: Which Is Right for You?
Many photographers ask whether they should use Squarespace's built-in gallery or invest in a specialized platform. Here's a detailed comparison:
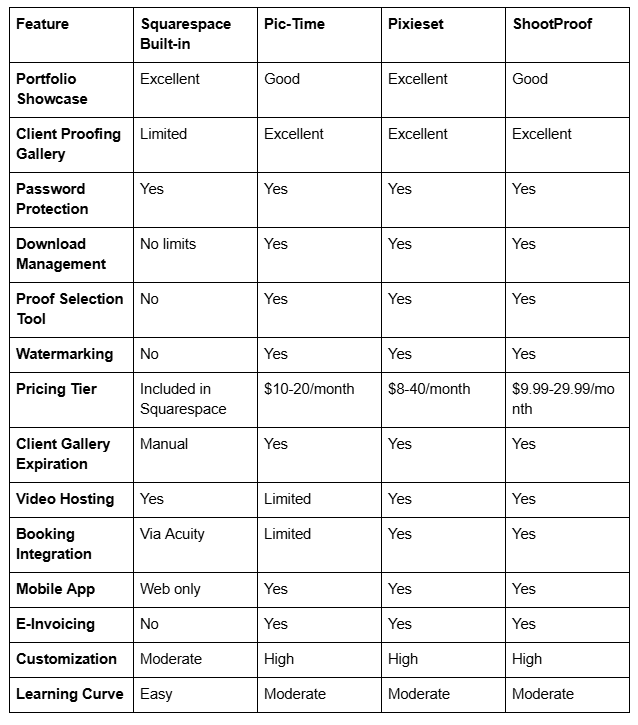
When to Use Squarespace's Built-In Gallery
Choose Squarespace if you:
Want to keep everything in one platform
Have a smaller client base and don't need advanced proofing
Prefer simplicity over specialized features
Are comfortable using Acuity for booking and file delivery
Want to avoid subscription fees for multiple services
Cost: Free (included in your Squarespace plan)
When to Use Pic-Time
Pic-Time is ideal if you:
Work with high volume (50+ sessions per year)
Provide extensive proofing and delivery services
Want clients to select their favorites before editing
Need detailed analytics on client behavior
Want to automate invoicing
Cost: $10-20/month (plus payment processing fees)
When to Use Pixieset
Pixieset is best if you:
Want a premium, designer-friendly platform
Offer album customization and product sales
Need integration with booking and pricing tools
Want built-in video capabilities
Care deeply about beautiful client experience
Cost: $8-40/month depending on features
When to Use ShootProof
ShootProof works well if you:
Need an all-in-one platform (gallery + booking + payments)
Sell prints and products through your gallery
Want extensive customization
Work with a high volume of events
Need comprehensive client management
Cost: $9.99-29.99/month
The Squareko Recommendation
For most photographers, a combination of Squarespace + Acuity Scheduling + Acuity's file delivery is the sweet spot. You get:
A beautiful portfolio that ranks in Google
A professional booking system integrated with your site
Basic client delivery without added monthly fees
All in one cohesive ecosystem
If you have very specific proofing needs (like clients selecting favorites before editing), consider adding Pic-Time for $10-20/month. It's a small investment compared to dedicated platforms that run $25-50+/month.
Pro Tips: Making Your Booking System Convert
Having a booking system is one thing. Getting people to actually use it is another. Here are proven strategies to increase conversions:
Tip 1: Make Booking Visible and Obvious
Your "Book Now" button should appear in multiple places:
In your main navigation menu
Below your portfolio gallery
In your homepage hero section
At the bottom of service description pages
Use contrasting colors and clear language: Book Now or Schedule Your Session rather than vague buttons like Learn More.
Tip 2: Price Clearly Upfront
Many photographers hide their pricing, thinking it creates mystery. In reality, it creates friction. When potential clients land on your site, they should quickly understand what you charge. Display pricing:
On your service pages
In the booking calendar (if possible through Acuity)
In your intake form
Tip 3: Show Testimonials and Results
Include client testimonials near your booking system. Potential clients want to know others have had a great experience. Example:
Sarah was amazing! She made us feel comfortable and captured moments we'll treasure forever. Highly recommend! — The Johnson Family
Tip 4: Reduce Friction in the Booking Process
Every step in the booking process is an opportunity for someone to abandon. Minimize questions in your intake form. Ask only essential information:
Event date and location
Service choice
Any special requests
Save additional questions for your consultation call.
Tip 5: Offer a Free Consultation
Many photographers worry free consultations are undervaluing their expertise. Actually, free consultations are one of your best conversion tools. They:
Remove risk for the potential client
Let you speak to them directly
Allow you to upsell or clarify details
Build trust and rapport
Tip 6: Follow Up Immediately
When someone books a consultation, send an automated confirmation email within minutes. Then personally reach out within 24 hours. Show them you're excited to work together.
Tip 7: Use Social Proof
Display your booking calendar on your homepage with a counter: Booked 87 sessions this year or Serving [city] since [year]. Social proof creates urgency.
Common Mistakes Photographers Make with Their Squarespace Gallery
Mistake 1: Putting Every Photo in Your Portfolio
A 200-photo gallery looks impressive to you but overwhelms potential clients. Edit ruthlessly. Include only your absolute best work—images you'd be proud to show at a gallery. Fewer, stronger images convert better than quantity.
Mistake 2: Not Optimizing Images for Web
Uploading full-resolution files slows down your site and makes it frustrating to browse on mobile. Squarespace automatically optimizes images, but you can help by:
Exporting images at 72 DPI for web (not 300 DPI for print)
Keeping file sizes under 1MB when possible
Using JPEG format instead of PNG for photos
Compressing images using tools like TinyPNG before upload
Mistake 3: Using Inconsistent Editing Styles
If your portfolio gallery shows dramatically different editing styles (some very bright, others dark; some warm, others cool), it looks amateurish. Develop a consistent editing style and apply it across your portfolio.
Mistake 4: Mixing Paid and Non-Paid Work
Don't include personal projects, assisted shoots, or non-professional work in your portfolio. This dilutes your perceived skill level. Show only work you were paid to create or that represents the quality you want to attract.
Mistake 5: Forgetting to Link to Your Booking System
You have a beautiful portfolio but no obvious booking button. Potential clients love your work but don't know how to hire you. Every page should have at least one link to your booking page.
Mistake 6: Not Updating Your Portfolio
A gallery with photos from 2020 looks stale. Update your portfolio every 6-12 months with your newest, best work. Remove older images as your style evolves. A fresh portfolio signals you're actively working and improving.
Mistake 7: Ignoring Mobile Experience
Over 60% of portfolio browsing happens on mobile. If your gallery looks broken on phones (images cut off, text too small, buttons hard to click), you'll lose clients. Test your gallery on actual mobile devices, not just browser previews.
Mistake 8: Not Using Descriptive Captions
"Portfolio" is a boring gallery with no context. Use captions to tell the story:
Smith Wedding, June 2025 | Captured 450 photos across ceremony, reception, and details
Johnson Family Portraits | Golden hour session in Central Park
Corporate Event | Tech conference keynote and networking coverage
These captions add context and help with SEO.
-
Yes, these serve completely different purposes. Your portfolio gallery is for marketing—it showcases your best work to potential clients and demonstrates your style. Your client delivery gallery is for fulfilling contracts—it's where clients access their final, edited photos. Combining them confuses your messaging. Potential clients see too many galleries, and your current clients see your marketing-focused images instead of their own photos. Keep them separate for clarity and professionalism.
-
This depends on your specific needs. Squarespace's gallery is excellent for portfolio display and costs nothing extra—it's included in your subscription. Pic-Time is better for client proofing workflows, especially if you want clients to select their favorites before you edit them. If you're just starting out or have a small client base, Squarespace is sufficient. If you have 30+ sessions per year and need advanced proofing features, Pic-Time's $10-20/month cost quickly pays for itself in time savings. Many photographers use both: Squarespace for portfolio showcase and Pic-Time for client delivery.
-
Not directly through Squarespace or Acuity's built-in gallery features. However, you can create a pricing structure where the gallery access is included in your session fee or offer premium packages that include extended gallery access (e.g., "photos delivered within 2 weeks" vs. "photos delivered within 1 week"). You could also use third-party platforms like Pixieset, which allow you to sell prints or digital products directly through the gallery, effectively charging for access to higher-quality versions.
-
This is a business decision based on your storage costs and data management preferences. A common approach is 60-90 days: long enough for clients to download their photos but short enough to avoid indefinite storage obligations. You can set expiration dates in Acuity, Pic-Time, Pixieset, and ShootProof. After expiration, you can archive the gallery offline or delete it. Some photographers keep galleries live longer for testimonials and portfolio referencing purposes—there's no one-size-fits-all answer.
-
In Acuity, you can manually resend the gallery link by navigating to the client's appointment and clicking "Send Gallery Link" again. In specialized platforms like Pic-Time and Pixieset, you can similarly regenerate links. Squarespace password-protected pages require you to manually email the link again. Always keep a system to track which clients have received gallery links and consider saving them in a spreadsheet for easy reference.
-
Squarespace's built-in gallery doesn't have watermarking functionality. If you want to watermark gallery photos, you must do it before uploading them to Squarespace. Use Lightroom, Photoshop, or free tools like Canva to add your watermark. Alternatively, specialized platforms like Pic-Time and ShootProof include watermarking tools directly in the gallery interface, so clients see watermarked proofs but receive unwatermarked final versions.
-
Establish clear terms in your session contracts. Specify:
Whether clients can share gallery links publicly or if it's private only
How long they have access to download photos
Whether they can print and sell photos
If they need permission to share photos on social media
In your gallery settings (especially in specialized platforms), you can disable sharing and downloading to enforce these rights. Include a terms statement in the gallery: "These photos are private and for personal use only. Sharing or redistributing without permission is prohibited."
-
Acuity Scheduling is excellent and integrates well with Squarespace, but other options include Calendly (simpler, less features), Setmore (budget-friendly), and ShootProof (all-in-one with gallery included). Acuity is best for photographers because it allows you to define custom services, manage deposits/payments, send automated reminders, and collect detailed intake information. If you want everything in one platform (booking + gallery + invoicing), ShootProof might be better. If you want simplicity, Calendly works. Acuity is the happy medium for most professional photographers.
Ready to Showcase Your Work and Book More Sessions?
The tools are in place for you to build a professional, conversion-focused photography website. You have Squarespace's powerful gallery features for showcasing your portfolio, Acuity Scheduling for managing bookings, and clear strategies for keeping clients happy with organized, password-protected delivery galleries.
But here's the reality: setup is one thing. Making sure everything works together seamlessly—and that your site actually attracts and converts clients—is another. Many photographers spend hours configuring their booking systems only to find that clients aren't clicking through, or that their portfolio galleries don't rank in Google.
At Squareko.com, we specialize in building Squarespace websites specifically for photographers. We handle the technical setup, optimize for search visibility, design galleries that showcase your work beautifully, and integrate booking systems that actually convert browsers into paying clients. We've helped 50+ photographers generate consistent bookings and business growth through their websites.
Here's what we offer:
A free 30-minute discovery call where we discuss your photography business, review your current website setup (if you have one), and identify the exact steps you need to take to book more clients. No pressure, no sales pitch—just actionable guidance tailored to your photography niche and business goals.
During this call, we can discuss whether a full website redesign, a booking system integration, or portfolio gallery optimization is right for you. We'll show you real examples of photographer websites we've built and explain our process.

From custom website design to SEO strategy, we help businesses launch a site that looks professional and performs better.

About the Author
Walid | Squareko.com
Walid is the founder of Squareko.com, a Squarespace web design agency specializing in websites for creative professionals, particularly photographers. With 8+ years of experience building and optimizing Squarespace sites, Walid has helped over 100 creative businesses establish strong online presence, attract qualified clients, and grow revenue through their websites. His expertise spans Squarespace design, SEO, client gallery integration, booking system setup, and conversion optimization. When he's not helping photographers get booked, Walid writes about Squarespace best practices, web design trends, and business growth strategies for creative professionals.