How to Purchase and Install a Squarespace Template
The short answer: Buying a premium Squarespace template is not a download. You choose a design, preview the live demo carefully — because premium templates are non-refundable — pay, and then receive a Squarespace contributor invitation rather than a file. The template is installed for you onto either a new site or your existing one. Ownership transfer is a separate step after that, and every demo image must be replaced before you launch.
Here is the whole process in the order it actually happens, with the three stages people skip flagged.
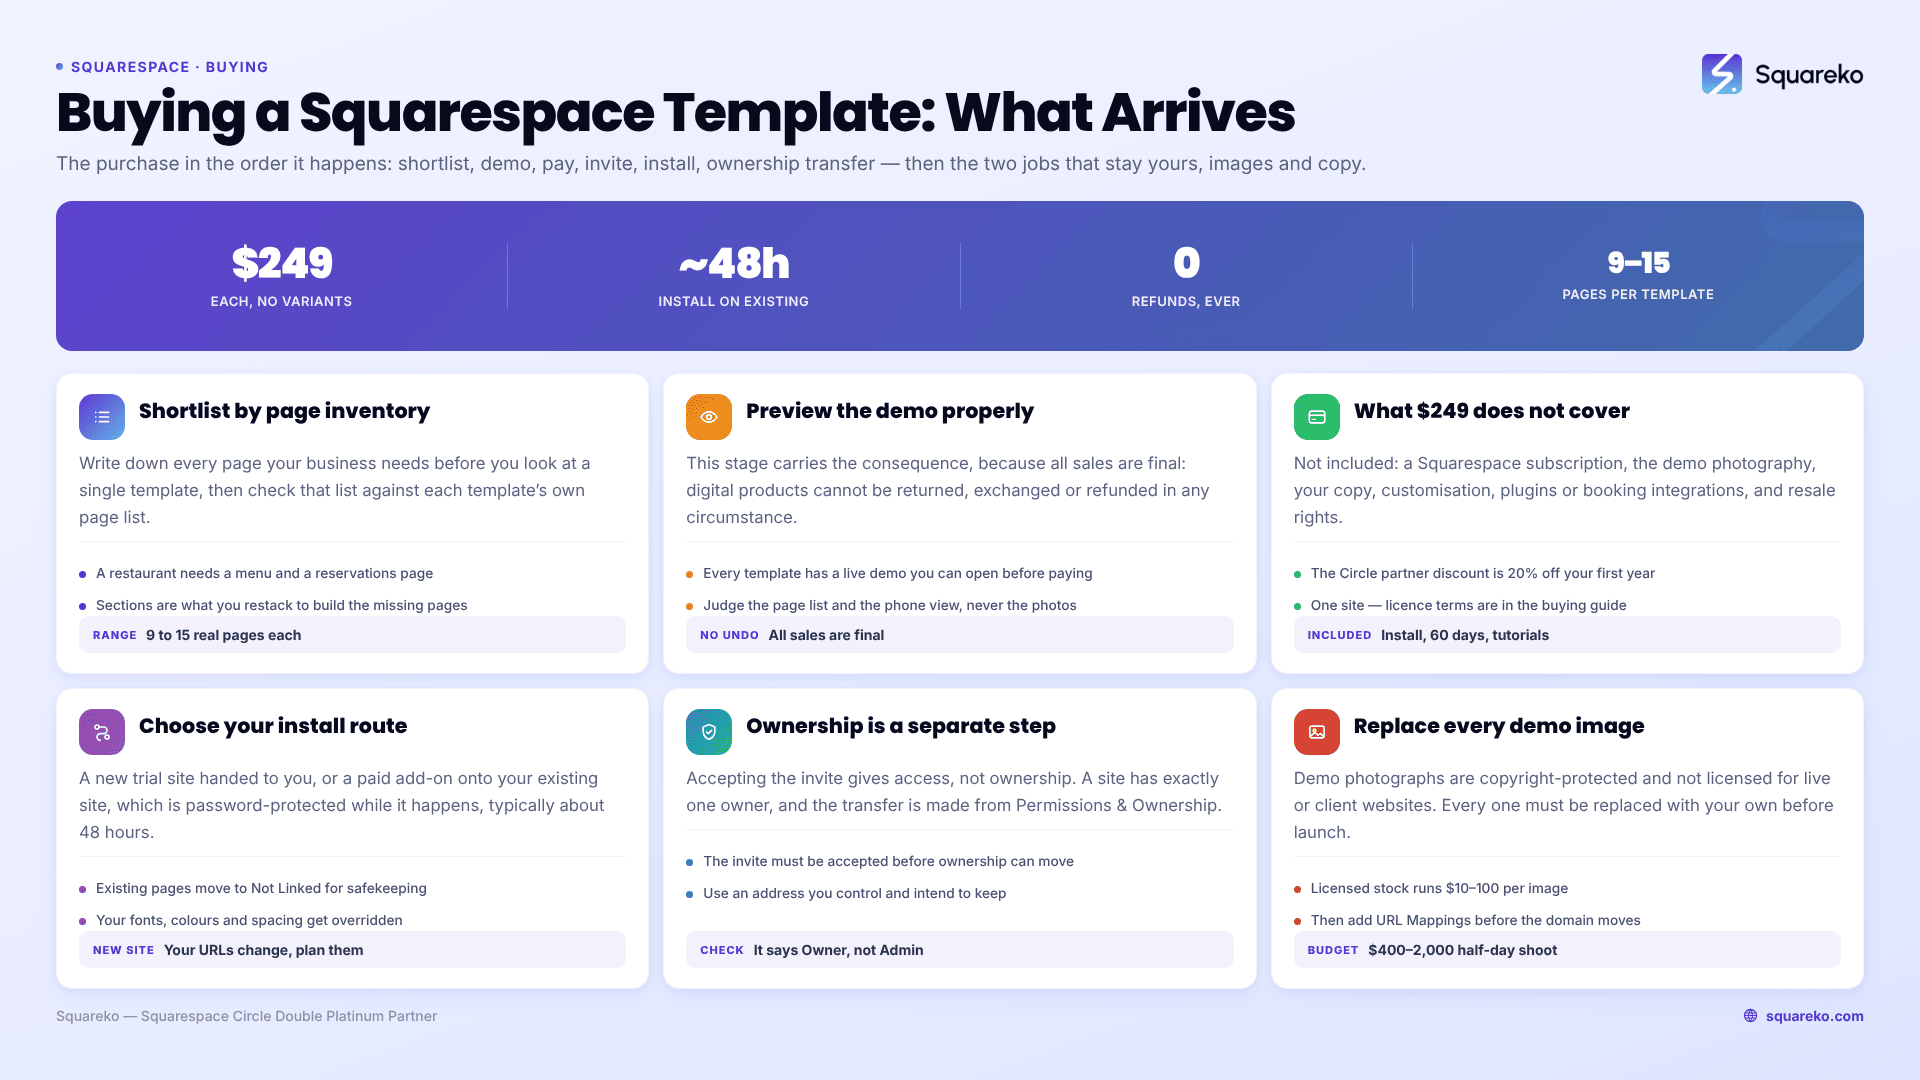
The purchase at a glance
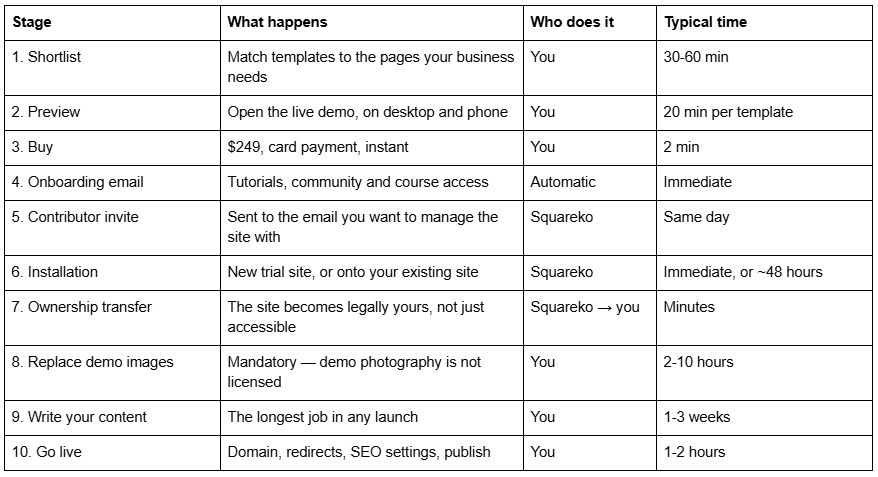
Stages 2, 7 and 8 are the ones people skip. Each of them is expensive to fix afterwards.
Stage 1 — Shortlist by page inventory, not by how the homepage looks
The most common buying mistake with premium Squarespace templates is choosing on the strength of the homepage. Homepages are the easiest page to make beautiful and the least predictive of whether a template will work for you.
Write down every page your business actually needs before you look at a single template. A restaurant needs a menu and a reservations page. A law firm needs case studies and practice-area detail pages. A course business needs a course page and pricing. Then check that list against each template's page list.
Squareko's 24 templates ship with 9 to 15 real pages depending on the template — Justify is the smallest at 9, WeDecorefy the largest at 15. Every one of them also includes 150+ pre-designed sections, a Style Guide page and a designed 404 page, which matters more than the page count: sections are what you restack to build the pages the demo doesn't have.
If more than two pages on your list have no equivalent in the template, that is a signal to look at a different template rather than plan to build them from scratch.
Stage 2 — Preview the live demo properly
This is the stage that carries the most consequence, because all sales of premium Squarespace templates are final. Squareko's published return policy states that digital products "cannot be returned, exchanged, or refunded under any circumstances." That is standard across the premium Squarespace template market — instant digital delivery makes returns effectively unenforceable — but it means there is no try-and-see.
Every Squareko template has a live demo you can open before buying. Working examples:
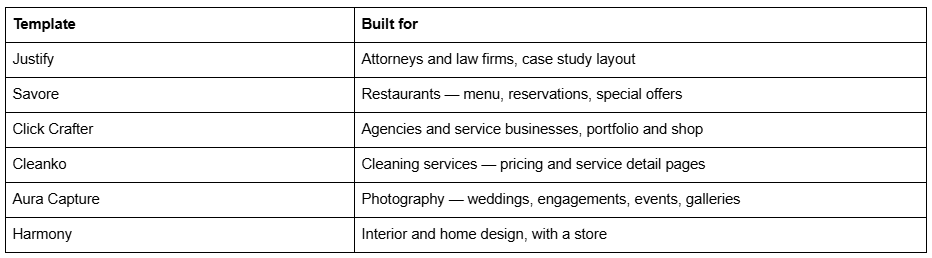
Preview in this order, and it is deliberately the reverse of how most people do it:
Read the page list first. Open the navigation and the footer. Are your pages there?
Open it on your phone. Squarespace 7.1 keeps a separate, independently editable mobile layout for every section. Most of your visitors will see that layout, not the desktop one.
Count the sections you would reuse. Scroll the whole site and note how many section designs you could restack into new pages. That number is the template's real value.
Ignore the photography completely. You are contractually required to replace it (see stage 8). Judging a template on its demo photos is the single most common reason people are disappointed after buying.
Six of the 24 templates — Advisory, BRIX Construction, Kiddo, Navigate, Storyline and Streamify — do not currently have a publicly working demo link. If one of those is on your shortlist, email before buying and ask for access rather than buying blind.
Stage 3 — Confirm what the $249 does and does not cover
Every Squareko template is $249, with no variants and no sale price. That price buys the design and the right to use it on one site.
Not included, and each one costs money or time:
A Squarespace subscription. Hosting, your domain and the platform come from Squarespace directly. Squareko recommends the Business plan, confirms templates work on Basic, and passes on 20% off your first year through its Circle partner discount.
The demo photography. Covered in full at stage 8.
Your copy. The template ships with placeholder text.
Customisation. The template is fully editable and the tutorials cover it, but having someone else redesign sections to your brand is separate work.
Plugins, custom code and booking integrations. Nothing of that kind is bundled.
Resale rights. The licence covers your own use on one site.
Included: installation, 60 days of email support, video tutorials, a 5-day course and a private community.
Stage 4 — What arrives after you pay
Two things arrive, usually within the same day and in this order.
An onboarding email with your tutorial access, course registration and community details. Open it before the invite — it explains the install choice you are about to make.
A Squarespace contributor invitation, sent to whichever email address you nominate. Choose this carefully. It should be the address you intend to keep permanently and that you control, not a colleague's, not an agency's, and not an alias you will lose access to when you change providers. Moving a Squarespace site between accounts later is a support ticket, not a settings toggle.
Squarespace's own documentation is clear that each contributor needs their own Squarespace account: when you accept a contributor invitation you can either create an account free or add the site to an existing Squarespace account you already have.
Stage 5 — Choose your installation route
There are two routes and the right one depends entirely on whether you already have a live site earning traffic.
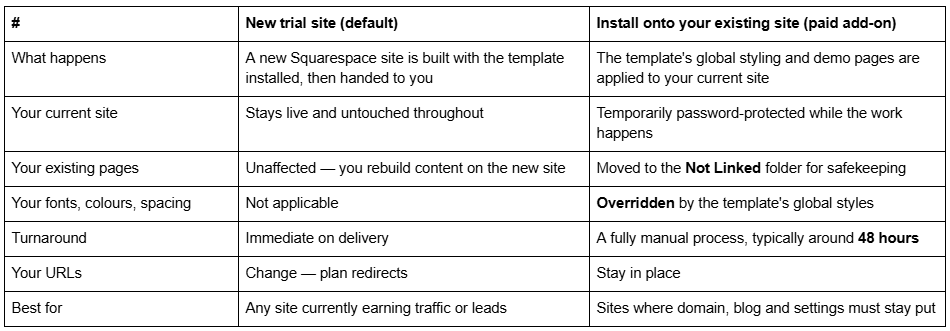
The trade-off is straightforward. The new-site route is cleaner and safer but means re-entering content and planning redirects. The existing-site route preserves your URL structure and blog archive but will visibly change the appearance of buttons, headings, backgrounds and sections you had already styled — because in Squarespace 7.1, global styles are genuinely global.
If you have an active site bringing in enquiries, take the new-site route.
Stage 6 — Ownership transfer is a separate step from the invite
This is the stage most walkthroughs miss, and it matters legally rather than practically.
Accepting a contributor invitation gives you access. It does not make you the owner. Squarespace treats these as two different things: as the Help Center puts it, "Site ownership is established by the owner permission level. While you can add multiple contributors with administrator permissions, a site can only have one owner, who can't be removed by any other contributor."
The transfer itself is done by the current owner, from Permissions & Ownership → click the owner's name → Transfer Ownership → select the new owner → Confirm. The future owner must already be a contributor and must have accepted their invitation before the transfer can happen — which is why the sequence is invite, accept, then transfer.
What to check before you consider the handover complete: open Permissions & Ownership on the site yourself and confirm your own account is listed as Owner, not Administrator. If it says Administrator, the transfer has not happened yet. Ask.
Also confirm the billing subscription is on your own Squarespace account rather than someone else's, and that your custom domain is either registered to your account or correctly pointed to the site.
Stage 7 — Replace every demo image
This is not optional and it is not a formality.
Squareko's published terms state that demo photographs are copyright-protected and not licensed for use on live or client websites. Every demo image in the template must be replaced with your own original or properly licensed photography before you launch. The same is true at essentially every premium Squarespace template shop — the images are licensed for the demo, not for you.
Practically, plan for one of three routes:
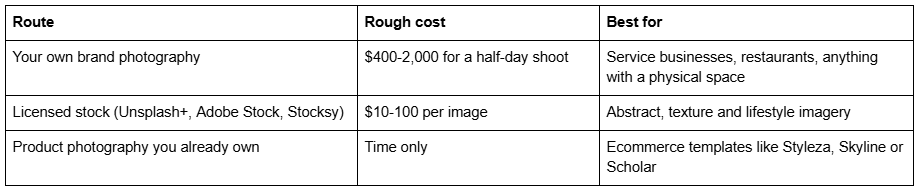
Two Squarespace-specific notes while you do this. Upload images at 1500-2500px wide — 2500px is the largest size Squarespace serves — and set the filename before uploading, because Squarespace filenames cannot be changed afterwards. The Squarespace CDN converts and serves WebP automatically, so there is no need to convert anything yourself.
Stage 8 — Write your content and keep the Style Guide page
Writing the real copy is the longest job in any website launch, template or custom. Budget one to three weeks and do it in a document, not in the Squarespace editor — editing in place makes you write to fit the design rather than to the point.
Every Squareko template includes a Style Guide page, usually sitting in the Not Linked section so visitors never see it. It documents the template's type scale, colour values, button styles and spacing rules. Do not delete it while tidying your page list. Six months from now you will add a page, guess at a heading size, pick a nearly-right grey, and the new page will look subtly off. The Style Guide page is what prevents that drift.
Stage 9 — Going live without losing your search rankings
If you took the new-site route, your page URLs have changed, and this is where a template launch quietly costs money.
Squarespace blog post URLs take the form /blog-page-slug/post-slug, and changing a slug creates no automatic 301 redirect, ever. Nothing warns you. The old URL simply starts returning a 404, and the rankings and backlinks pointing at it go with it.
Before you publish:
Export your current URL list — crawl the old site or pull the page list from Google Search Console.
Match every old URL to its equivalent on the new template site.
Add a redirect for anything whose slug changed, in Settings → Developer Tools → URL Mappings, using Squarespace's syntax: /old-url -> /new-url 301
Remove the site-wide password, connect your domain, and check that SSL is active.
Resubmit your sitemap in Google Search Console. Squarespace's sitemap updates automatically, but indexing lag after a redesign runs days to weeks.
For context on what a well-built Squarespace 7.1 site can be expected to do on performance: across 54 Squareko-built client sites measured in August 2026 (Playwright/Chromium lab test, cloud datacentre, unthrottled, single run per site, load-only CLS — lab data, not field data), median mobile LCP was 2.01s with 74% under Google's 2.5s "good" threshold, and median TTFB was 514ms. Templates are not what makes a Squarespace site fast or slow; image weight and how many sections you stack on the homepage are.
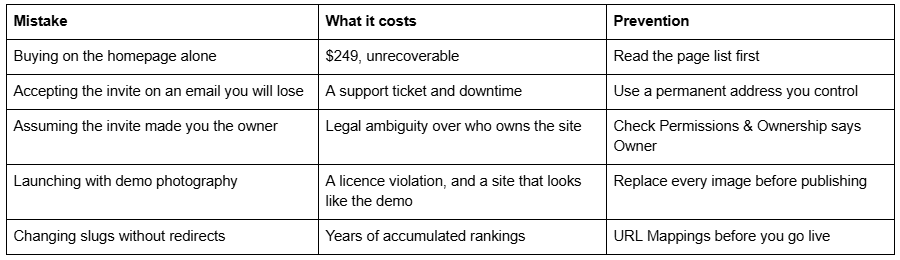
The five mistakes that cost the most
Before you buy
Work stages 1 and 2 properly and the rest of this process is administrative. Page list, then mobile view, then section count, then price. If the pages you need exist and the sections look reusable, a template gets you live in two to four weeks with most of the design decisions already made for you.
You can browse the full range on the premium Squarespace templates page — 24 designs, $249 each, 9 to 15 pages depending on the template, installed by us rather than emailed to you as files. If your page inventory doesn't fit any of them, or you need memberships, a real integration or multi-level navigation, a template is the wrong purchase and the honest answer is a custom Squarespace design instead. Either way, ask before you buy — the no-refund policy above means there is no undo.
FAQ
-
You usually don't — the shop installs it. Squareko delivers via a Squarespace contributor invitation and installs the template either onto a new site that is then transferred to you, or onto your existing site as a paid add-on taking around 48 hours. There is no file to upload, unlike WordPress themes.
-
An email invite that grants your Squarespace account access to a site. Each contributor needs their own Squarespace account; when you accept, you can create one free or add the site to an existing account. Accepting the invite gives you access, not ownership — those are separate permission levels.
-
The current owner opens Permissions & Ownership, clicks the owner's name, selects Transfer Ownership, then chooses the new owner and confirms. The new owner must already be a contributor who has accepted their invitation. A Squarespace site can only have one owner at a time.
-
No. Squareko's published terms state demo photographs are copyright-protected and not licensed for use on live or client websites. Every demo image must be replaced with your own original or licensed photography before launch. This is standard across premium Squarespace template shops.
-
No. Squareko's return policy states digital products cannot be returned, exchanged or refunded under any circumstances, which is standard for instantly delivered digital goods. Use the live demo thoroughly on desktop and phone, and email pre-sale questions about compatibility first.
-
Yes. The $249 covers the design and the right to use it only. Hosting, your domain and the platform come from Squarespace directly. Squareko recommends the Business plan, confirms the templates work on Basic, and passes on 20% off your first year through its Circle partner discount.

Author Bio
I'm Walid Hasan, a Certified Squarespace Expert and Squarespace Circle Platinum Partner with over 12 years of hands-on experience designing and optimizing high-performing websites. Over the years, I've had the privilege of building more than 2,000 Squarespace websites for clients around the world, always focusing on clean design, strong user experience, and conversion-driven results.